Updating your existing WordPress blog posts with the new Gutenberg editor is easy and completely user-friendly.
What To Know About The Gutenberg Block Editor
Below you will find a quick and simple step by step guide to convert your existing blog posts using the new Gutenberg editor included in the WordPress 5.0 update. But first, let’s talk a little about how the Gutenberg editor works.
Though the new Gutenberg block editor is a groundbreaking WordPress update (it completely changes the way you create content!), it is not something to intimidate you by any means. The most predominant change is the use of blocks in creating new content. These easy-to-use blocks allow you to create blog posts without the use of additional WordPress plugins for editing content, essentially making your life easier and more concise.
The new WordPress editor allows you to quickly add content to your post by choosing a particular block. These blocks include your most used options like a new paragraph, image, header, list, button, gallery, and the list goes on. Just as convenient, the blocks also include more complex options such as adding shortcodes and your own custom code.

Looking for more detailed information about the Gutenberg block editor? Read “Approaching the New Gutenberg Editor in WordPress 5” for more information about the possible impact the new Gutenberg editor may have on your WordPress blog website.
Steps to Update Existing Posts with the Gutenberg Editor.
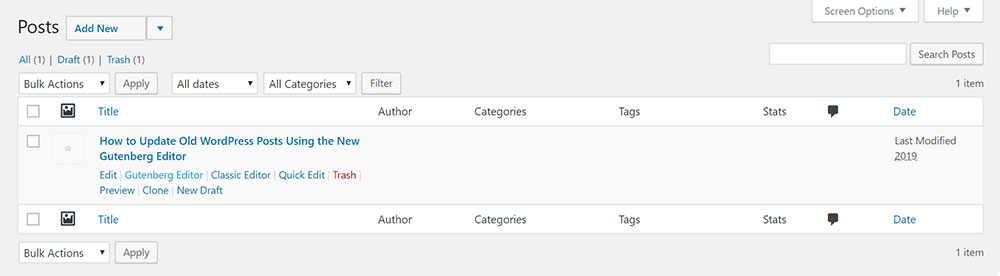
1. Getting to the new Gutenberg Editor.
In the “All Posts” screen, hover over the post you would like to update. Click on “Gutenberg Editor”.
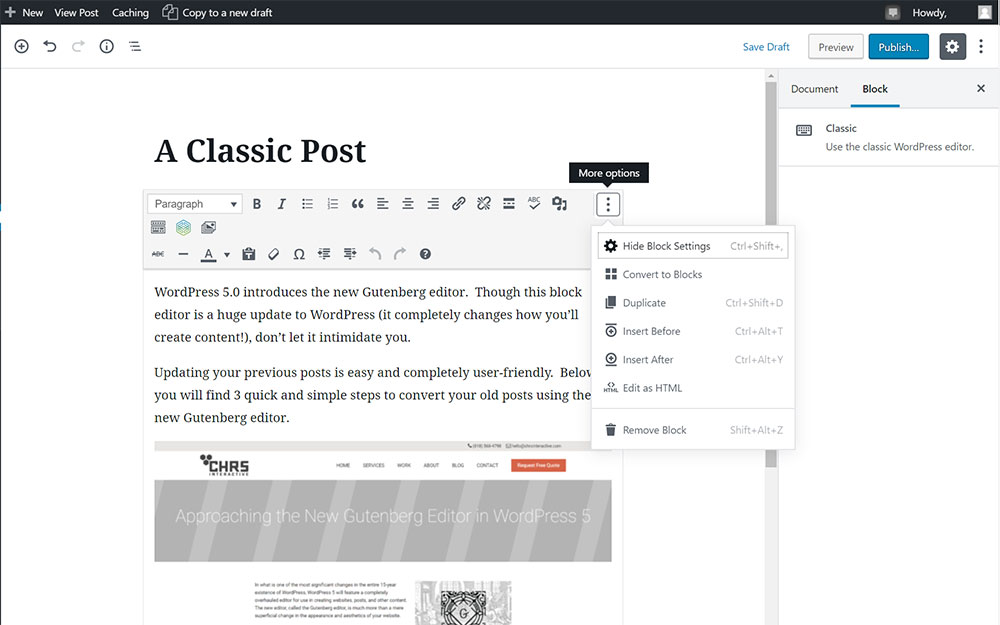
2. Click “Convert to Blocks” in More Options.
When your post opens, you will be in the Classic Post view. In this screen you will see your content in a single classic block. When you are here, click on the single content block. Once you do so, three dots will appear in the upper right hand corner of the single content block. Click those three dots to see the block menu. Finally, click “Convert to Blocks”.
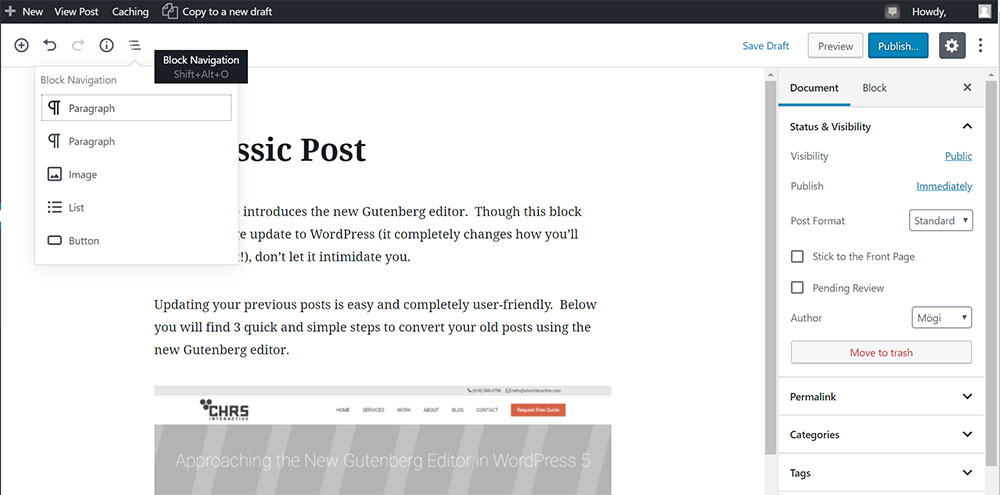
3. Review your blocks in “Block Navigation”.
The block navigation menu displays all of your new blocks in one quick glance. The block navigation is located in the upper left hand corner of the post screen. Clicking on an item in the block navigation menu will immediately take you to that block in the editor. Use the menu located at the top of the block to edit, add, or delete content. You can even move a block by clicking the up or down arrows located on the left hand side of the block or simply click and hold in between the two arrows to drag and drop a block. Update your post by clicking “Update” in the upper right hand corner of the editor.
And, there you have it. Following this easy step-by-step guide will help you update your existing WordPress blog post using the new Gutenberg block editor. Check out our other blog posts at CHRSInteractive.com for information about everything WordPress.